
How to Set Up Dynamic DNS for Your Home Lab in 2025
8 minute read | October 9, 2025 | LockIP Team
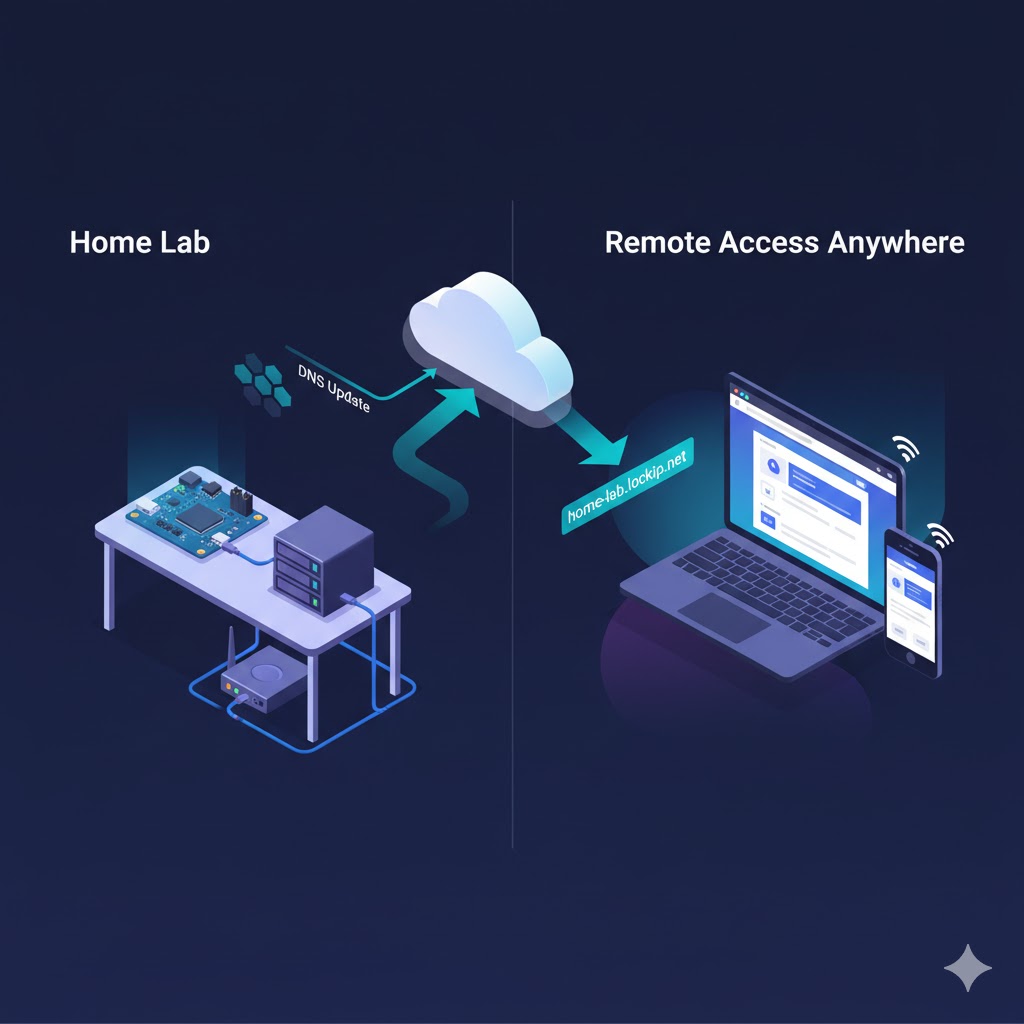
You've spent hours setting up your home lab—configuring servers, installing services, getting everything just right. Then you leave home, try to access your Plex server or Home Assistant dashboard, and... nothing works. Your IP address changed, and now you can't reach your carefully crafted infrastructure.
Sound familiar? This is exactly why Dynamic DNS exists, and why every serious home lab needs it.
In this guide, we'll walk you through everything you need to know about setting up Dynamic DNS for your home lab, from understanding why you need it to implementing it using multiple methods. Whether you're running a Raspberry Pi, a full server rack, or anything in between, you'll be able to access your services from anywhere by the end of this article.
Table of Contents
- Why Your Home Lab Needs Dynamic DNS
- Understanding How Dynamic DNS Works
- Three Methods to Set Up DDNS
- Setting Up DDNS with Your Router
- Using a DDNS Client on Linux
- API-Based Updates (Most Reliable Method)
- Troubleshooting Common DDNS Issues
- Security Considerations
Why Your Home Lab Needs Dynamic DNS
Most home internet connections use dynamic IP addresses—meaning your ISP can change your public IP address at any time. While this usually doesn't happen daily, it can occur during network maintenance, router reboots, or random intervals depending on your ISP's DHCP lease times.
Here's the problem: if you're hosting services like:
- Media servers (Plex, Jellyfin, Emby)
- Home automation (Home Assistant, OpenHAB)
- Network storage (Nextcloud, Synology)
- Game servers (Minecraft, Valheim)
- Development environments (GitLab, Jenkins)
- Security cameras (Frigate, ZoneMinder)
...you need a consistent way to reach them. A static IP address from your ISP can cost $5-15/month (or more). Dynamic DNS gives you the same capability for free.
Think of DDNS like a phone book that automatically updates itself. When your IP changes, your DDNS service immediately updates the DNS record, so homelab.yourdomain.com always points to your current IP address.
Understanding How Dynamic DNS Works
Before we dive into setup, let's quickly demystify how DDNS works behind the scenes:
- Your client detects an IP change (router, computer, or script checks your public IP)
- Update sent to DDNS service (API call with your new IP address)
- DNS records updated (the DDNS provider updates your domain's A record)
- Propagation (nameservers reflect the change—with modern providers like LockIP, this is instant)
The entire process takes seconds with a properly configured system. At LockIP, we built our infrastructure on PowerDNS specifically to ensure these updates propagate in real-time across our geographically redundant nameservers.

What You'll Need
Before starting, gather:
- A domain name (you can use subdomains:
lab.yourdomain.com) - A Dynamic DNS provider account (we'll use LockIP for examples)
- Access to your router's admin panel OR a device on your network
- About 15-30 minutes
Three Methods to Set Up DDNS
There are three main approaches to keeping your DDNS updated, each with pros and cons:

Let's explore each method in detail.
Setting Up DDNS with Your Router
Most modern routers have built-in DDNS support. This is the easiest method for beginners.
Step 1: Check Router Compatibility
Log into your router (typically at 192.168.1.1 or 192.168.0.1) and look for:
- Dynamic DNS section
- DDNS settings
- Custom DDNS provider options
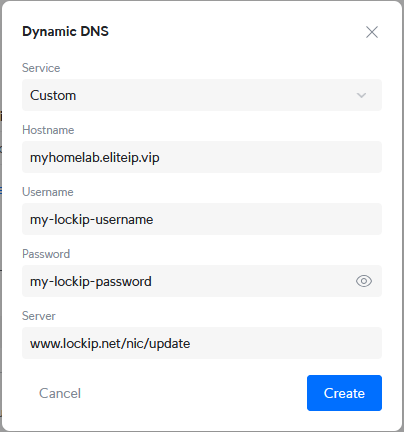
Step 2: Configure Custom DDNS Provider
Many routers only support legacy providers like DynDNS or No-IP out of the box. For modern providers, you'll need to use "Custom" settings.
Here's a typical configuration:
Service Provider: Custom
Server Address: www.lockip.net/nic/update
Hostname: homelab.yourdomain.com
Username: your-email@example.com
Password/Key: your-password-here
Update URL: https://www.lockip.net/nic/update?hostname=<domain>&ip=<ipaddr>
Note: The exact URL format varies by router manufacturer. Check your router's documentation or your DDNS provider's support pages.
Step 3: Test the Update
Most routers have a "Test" or "Force Update" button. Click it and verify that:
- Your router shows "Success" or similar
- Check your DDNS provider's dashboard to confirm the IP matches your current public IP
Router Method Pros & Cons
✅ Pros:
- Set-it-and-forget-it simplicity
- No additional software needed
- Works even if all your devices are offline
❌ Cons:
- Limited provider support
- Some routers update slowly (5-30 minute intervals)
- Difficult to troubleshoot when it breaks
- Single point of failure
Using a DDNS Client on Linux
For more control and reliability, install a DDNS client on an always-on device like a Raspberry Pi or home server.
Installing DDClient
DDClient is the most popular Linux DDNS client. Here's how to set it up on Ubuntu/Debian:
# Install ddclient
sudo apt update
sudo apt install ddclient

# During installation, you can skip the automatic configuration
# We'll configure manually for better control
Configuring DDClient for LockIP
Create or edit the configuration file:
sudo nano /etc/ddclient.conf
Add this configuration:
# DDClient configuration for LockIP
daemon=300                          # Check every 5 minutes
syslog=yes                          # Log to syslog
mail-failure=root                   # Email on failure
pid=/var/run/ddclient.pid          # PID file location

# Use web service to determine public IP
use=web, web=checkip.amazonaws.com

# LockIP configuration
protocol=dyndns2
server=www.lockip.net/nic/update
login=your-username
password='your-password-here'
homelab.yourdomain.com
Start and Enable the Service
bash
# Start the service
sudo systemctl start ddclient

# Enable it to start on boot
sudo systemctl enable ddclient

# Check status
sudo systemctl status ddclient

# View recent logs
sudo journalctl -u ddclient -f
You should see output like:
SUCCESS: homelab.yourdomain.com updated to 203.0.113.45
DDClient Method Pros & Cons
✅ Pros:
- More reliable than router-based updates
- Faster update intervals (down to 1 minute if needed)
- Better logging and troubleshooting
- Works with virtually any DDNS provider
❌ Cons:
- Requires an always-on device
- More complex setup
- Needs maintenance/updates occasionally
API-Based Updates (Most Reliable Method)
For maximum flexibility and reliability, use direct API calls. This method is perfect for advanced users or when managing multiple hostnames.
Understanding the API Approach
Instead of relying on third-party clients, you make HTTPS requests directly to your DDNS provider's API. This gives you complete control over when and how updates occur.
At LockIP, our API is designed to be simple yet powerful. Here's the basic structure:
curl -X POST https://www.lockip.net/nic/update?hostname=homelab.yourdomain.com&myip=12.34.56.78 \
  -H "Authorization: Bearer YOUR_API_KEY"
The "ip": "auto" parameter tells LockIP to detect your IP from the request—no need to determine it yourself.
Creating a Simple Update Script
Let's create a robust update script for Linux:
#!/bin/bash
# LockIP DDNS Update Script
# Save as: ~/scripts/update-ddns.sh

# Configuration
API_KEY="your_api_key_here"
HOSTNAME="homelab.yourdomain.com"
API_URL="https://www.lockip.net/nic/update"
LOG_FILE="/var/log/lockip-ddns.log"

# Get current timestamp
TIMESTAMP=$(date '+%Y-%m-%d %H:%M:%S')

# Get current public IP (optional - if not provided, server will detect it)
# Uncomment one of these methods to explicitly set IP:
# MYIP=$(curl -s https://api.ipify.org)
# MYIP=$(curl -s https://icanhazip.com)
# MYIP=$(dig +short myip.opendns.com @resolver1.opendns.com)

# Make API request
# If MYIP is set, include it in the query; otherwise let server auto-detect
if [ -n "$MYIP" ]; then
    RESPONSE=$(curl -s -X GET "${API_URL}?hostname=${HOSTNAME}&myip=${MYIP}" \
    -H "Authorization: Bearer ${API_KEY}")
else
    RESPONSE=$(curl -s -X GET "${API_URL}?hostname=${HOSTNAME}" \
    -H "Authorization: Bearer ${API_KEY}")
fi

# Log the result
echo "[$TIMESTAMP] Update response: $RESPONSE" >> "$LOG_FILE"

# Check for success (DDNS protocol responses)
if echo "$RESPONSE" | grep -qE "^(good|nochg)"; then
	echo "[$TIMESTAMP] ✓ DDNS update successful: $RESPONSE" >> "$LOG_FILE"
	exit 0
elif echo "$RESPONSE" | grep -q "badauth"; then
	echo "[$TIMESTAMP] ✗ Authentication failed - check API key" >> "$LOG_FILE"
	exit 1
elif echo "$RESPONSE" | grep -q "nohost"; then
	echo "[$TIMESTAMP] ✗ Hostname not found" >> "$LOG_FILE"
	exit 1
elif echo "$RESPONSE" | grep -q "dnserr"; then
	echo "[$TIMESTAMP] ✗ DNS server error" >> "$LOG_FILE"
	exit 1
else
	echo "[$TIMESTAMP] ✗ Unknown response: $RESPONSE" >> "$LOG_FILE"
	exit 1
fi
Make it executable:
chmod +x ~/scripts/update-ddns.sh
Automating with Cron
Set up a cron job to run every 5 minutes:
# Edit crontab
crontab -e

# Add this line (runs every 5 minutes)
*/5 * * * * /home/yourusername/scripts/update-ddns.sh
Advanced: Monitoring IP Changes
For even better efficiency, only update when your IP actually changes:
#!/bin/bash
# Smart DDNS updater - only updates on IP change

API_KEY="your_api_key_here"
HOSTNAME="homelab.yourdomain.com"
API_URL="https://www.lockip.net/nic/update"
IP_FILE="/tmp/last_known_ip"
LOG_FILE="/var/log/lockip-ddns.log"

# Get current timestamp
TIMESTAMP=$(date '+%Y-%m-%d %H:%M:%S')

# Get current public IP
CURRENT_IP=$(curl -s https://checkip.amazonaws.com | tr -d '[:space:]')

# Verify we got a valid IP
if [ -z "$CURRENT_IP" ]; then
    echo "[$TIMESTAMP] ✗ Failed to detect public IP" | tee -a "$LOG_FILE"
    exit 1
fi

# Read last known IP
if [ -f "$IP_FILE" ]; then
    LAST_IP=$(cat "$IP_FILE" | tr -d '[:space:]')
else
    LAST_IP=""
fi

# Only update if IP changed
if [ "$CURRENT_IP" != "$LAST_IP" ]; then
    echo "[$TIMESTAMP] IP changed from $LAST_IP to $CURRENT_IP, updating..." | tee -a "$LOG_FILE"

    # Make the API request with query parameters
    RESPONSE=$(curl -s -X GET "${API_URL}?hostname=${HOSTNAME}&myip=${CURRENT_IP}" \
      -H "Authorization: Bearer ${API_KEY}")

    # Check response
    if echo "$RESPONSE" | grep -qE "^good"; then
        echo "[$TIMESTAMP] ✓ Update successful: $RESPONSE" | tee -a "$LOG_FILE"
        # Save new IP only on success
        echo "$CURRENT_IP" > "$IP_FILE"
        exit 0
    elif echo "$RESPONSE" | grep -qE "^nochg"; then
        echo "[$TIMESTAMP] ✓ No change reported by server: $RESPONSE" | tee -a "$LOG_FILE"
        # Still save the IP since server confirmed it
        echo "$CURRENT_IP" > "$IP_FILE"
        exit 0
    elif echo "$RESPONSE" | grep -q "badauth"; then
        echo "[$TIMESTAMP] ✗ Authentication failed - check API key" | tee -a "$LOG_FILE"
        exit 1
    elif echo "$RESPONSE" | grep -q "nohost"; then
        echo "[$TIMESTAMP] ✗ Hostname not found: $HOSTNAME" | tee -a "$LOG_FILE"
        exit 1
    elif echo "$RESPONSE" | grep -q "dnserr"; then
        echo "[$TIMESTAMP] ✗ DNS server error" | tee -a "$LOG_FILE"
        exit 1
    else
        echo "[$TIMESTAMP] ✗ Unknown response: $RESPONSE" | tee -a "$LOG_FILE"
        exit 1
    fi
else
    echo "[$TIMESTAMP] IP unchanged ($CURRENT_IP), no update needed" | tee -a "$LOG_FILE"
    exit 0
fi
This approach minimizes unnecessary API calls and reduces load on both your system and the DDNS service.
API Method Pros & Cons
✅ Pros:
- Maximum reliability and control
- Update only when IP changes
- Easy to customize for multiple hostnames
- Simple to monitor and debug
- Works with any scripting language (Python, Bash, PowerShell)
- Integrates easily with monitoring systems
❌ Cons:
- Requires scripting knowledge
- Need to manage the script yourself
- Requires an always-on device
💡 Pro Tip: Modern DDNS providers like LockIP use PowerDNS for instant propagation. When your script updates your IP, the change is live within seconds across all nameservers—no waiting for DNS propagation delays.
Troubleshooting Common DDNS Issues
Even with a solid setup, you might encounter issues. Here's how to diagnose and fix the most common problems:
Issue 1: Updates Not Working
Symptoms: Your DDNS hostname points to an old IP address
Diagnosis:
bash
# Check what IP your hostname resolves to
nslookup homelab.yourdomain.com

# Check your actual public IP
curl https://checkip.amazonaws.com

# Compare the two
Solutions:
- Verify your API key is correct and hasn't expired
- Check if your update script/client is actually running
- Review logs for error messages
- Test a manual update using curl to isolate the issue
Issue 2: Frequent Disconnections
Symptoms: You can access your services, but connection drops randomly
Possible Causes:
- Your ISP is changing your IP frequently
- DNS caching on client devices
- TTL (Time To Live) set too high
Solutions:
bash
# Check your DNS TTL setting
dig homelab.yourdomain.com

# Look for the TTL value (should be 60-300 seconds for DDNS)
At LockIP, we automatically set appropriate TTL values for Dynamic DNS hostnames (typically 60-120 seconds) to ensure rapid updates when your IP changes.
Issue 3: "Authentication Failed" Errors
Symptoms: Your update attempts are rejected
Solutions:
- Double-check your API key (no extra spaces or quotes)
- Verify your account is active
- Ensure you're using the correct authentication method
- Check if your IP is being rate-limited (though this is rare with legitimate use)
Issue 4: DNS Resolution Works, But Services Unreachable
Symptoms: DNS resolves correctly, but you can't access services
This usually isn't a DDNS issue. Check:
- Port forwarding rules on your router
- Firewall settings on your server
- Service status on your home lab devices
- ISP blocking common ports (80, 443, etc.)
bash
# Test if port is open from outside
# Use a service like https://www.yougetsignal.com/tools/open-ports/

# Check local firewall
sudo ufw status

# Test service is listening
sudo netstat -tlnp | grep :80
Security Considerations for Home Lab DDNS
Opening your home lab to the internet requires careful security planning. Here's how to do it safely:
1. Never Expose Everything
Don't port-forward your entire network. Be selective:
- Do expose: Specific services behind reverse proxy (Nginx, Traefik)
- Don't expose: Router admin, SSH on default port, databases, internal admin panels
2. Use a Reverse Proxy
A reverse proxy adds a critical security layer:
nginx
# Example Nginx configuration
server {
    listen 443 ssl http2;
    server_name homelab.yourdomain.com;

    ssl_certificate /etc/letsencrypt/live/homelab.yourdomain.com/fullchain.pem;
    ssl_certificate_key /etc/letsencrypt/live/homelab.yourdomain.com/privkey.pem;

    # Only proxy specific services
    location /plex {
        proxy_pass http://192.168.1.100:32400;
        proxy_set_header Host $host;
        proxy_set_header X-Real-IP $remote_addr;
    }

    # Block everything else
    location / {
        return 404;
    }
}
3. Implement Authentication
Even with DDNS, add authentication layers:
- VPN first approach: Use WireGuard or Tailscale, then access services
- HTTP authentication: Basic or OAuth2 at the reverse proxy level
- Application-level auth: Enable built-in authentication in each service
- 2FA everywhere: Where supported, enable two-factor authentication
4. Monitor Access Attempts
Set up fail2ban to block brute force attempts:
bash
# Install fail2ban
sudo apt install fail2ban

# Configure for nginx
sudo nano /etc/fail2ban/jail.local
Add:
ini
[nginx-http-auth]
enabled = true
port = http,https
logpath = /var/log/nginx/error.log
maxretry = 3
bantime = 3600
5. Keep Services Updated
Automated updates are crucial:
bash
# Ubuntu/Debian automatic security updates
sudo apt install unattended-upgrades
sudo dpkg-reconfigure -plow unattended-upgrades
6. Use HTTPS Everywhere
Never expose HTTP-only services. Use Let's Encrypt for free SSL certificates:
bash
# Install certbot
sudo apt install certbot python3-certbot-nginx

# Get certificate
sudo certbot --nginx -d homelab.yourdomain.com

# Auto-renewal is configured automatically
7. Segment Your Network
Use VLANs to isolate your home lab from personal devices:
- VLAN 1: Personal devices (phones, laptops)
- VLAN 10: Home lab servers
- VLAN 20: IoT devices (cameras, smart home)
This limits damage if any service is compromised.
💡 Security Pro Tip: The most secure home lab is one behind a VPN. Consider using WireGuard or Tailscale for access instead of exposing services directly. You can still use DDNS for your VPN endpoint, but keep your services completely private.
Conclusion
Setting up Dynamic DNS for your home lab is an essential skill that transforms how you access your self-hosted services. Whether you choose the simplicity of router-based updates, the reliability of a DDNS client, or the flexibility of API-based scripts, you now have the knowledge to implement a solution that works for your specific needs.
Key Takeaways:
- Start simple: Router-based DDNS is fine for basic setups and learning
- Scale up: Move to a DDNS client or API script as your needs grow
- Security first: Always use HTTPS, authentication, and consider VPN access
- Monitor and maintain: Check logs regularly and keep your update mechanism running
Ready to set up your own Dynamic DNS? Get started with LockIP free—no credit card required. Our PowerDNS-based infrastructure ensures your updates propagate instantly, and our API makes integration simple whether you're using a router, client, or custom script.
Have questions or want to share your home lab setup? Reach out to our support team or check out our detailed documentation for more advanced configurations.